基本介绍
🤖️ DB-GPT是一个开源的AI原生数据应用开发框架(AI Native Data App Development framework with AWEL(Agentic Workflow Expression Language) and Agents)。
目的是构建大模型领域的基础设施,通过开发多模型管理(SMMF)、Text2SQL效果优化、RAG框架以及优化、Multi-Agents框架协作、AWEL(智能体工作流编排)等多种技术能力,让围绕数据库构建大模型应用更简单,更方便。
环境搭建
DB-GPT的部署搭建有专门的文档说明快速开始_V0.7.0由于此时已经更新到V0.7.0,环境的部署需要依赖uv实现
关键步骤
此处以VMware Ubuntu为例,python环境要求3.10以上。
安装Miniconda
首先安装Miniconda,官网如下:
注意是安装Miniconda,Conda太大了。
安装uv
1 | curl -LsSf https://astral.sh/uv/install.sh | sh |
拉取项目
1 | git clone https://github.com/eosphoros-ai/DB-GPT.git |
安装依赖
如果只用到代理模型的话,使用以下指令:
1 | uv sync --all-packages --frozen \ |
如果用到了本地模型(比如你使用了本地的微调模型):
1 | uv sync --all-packages --frozen \ |
配置文件
配置文件在DB-GPT/configs文件夹下,你可以根据自己的模型选择合适的模型配置,这里我使用的是deepseek。
修改的是dbgpt-proxy-deepseek.toml文件,默认无修改的文件中有两处需要修改:
使用api
第一处是[models]下,name中的内容需要从deepseek-reasoner修改为deepseek-chat,否则在运行后与模型对话会出现报错:
1 | ERROR!Model server error!code=1, error msg is LLMServer Generate Error, Please CheckErrorInfo.:Error code: 400 -{error':[message':'deepseek-reasoner does not support successive user or assistant messages (messages[1] and messages[2] in your input). You should interleave the user/assistant messages in the message sequence.,'type':"invalid_request_error','param':None,'code':"invalid_request_error'} |
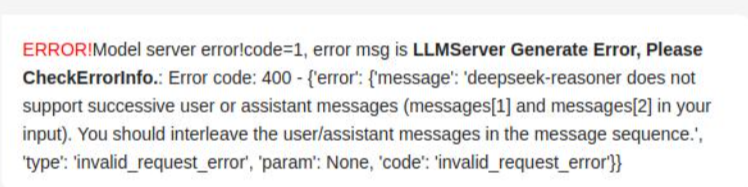
,如果不修改此name的话也可以选择在models文件夹下从hugging face下载deepseek模型即可。填写自己的api_key。
第二处是[[models.embeddings]]下,这是一个嵌入式模型,用于在原模型的基础上添加一些功能,和Stable-diffusion中的embedding一样。默认的配置文件中添加了bge-large-zh-v1.5模型,如果你也需要这个模型的话,需要从hugging face上下载该模型到DB-GPT/models文件夹下。
样例toml文件如下:
其中马赛克处替换为自己的deepseek的api_key 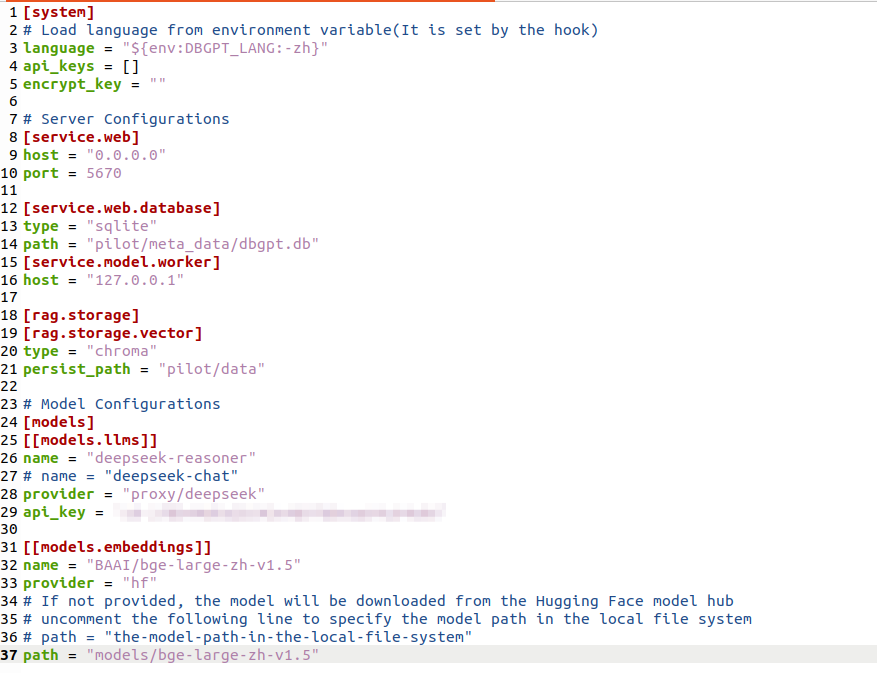
使用本地模型
其实可以参考使用api部分的embeddings部分,因为此时选择的embedding就是使用本地模型,具体操作是设置provider = “hf”
样例toml文件如下:
样例中使用的是微调后的模型,加入了微调后的lora文件,如果没有需求可以不加。

前端修改构建
直接进行构建的话并不能成功,我们需要先解决一些问题,一是源代码上的一些问题,二是环境版本等的问题。
源代码报错修改
报错内容
1
2
3
4
5
6
7
8
9
10
11
12
13
14
15
16
17
18
19
20
21
22
23
24
25
26
27
28
29
30
31
32
33
34
35
36
37
38
39
40
41
42
43
44
45
46
47
48
49
50
51
52
53
54
55
56
57
58
59
60
61
62
63
64
65sjx@ubuntu:~/DB-GPT/web$ npm run build
> db-gpt-web@0.1.0 build
> NODE_OPTIONS=--max_old_space_size=8192 next build
- warn You have enabled experimental feature (esmExternals) in next.config.js.
- warn Experimental features are not covered by semver, and may cause unexpected or broken application behavior. Use at your own risk.
Failed to compile.
./new-components/chat/sider/ChatSider.tsx
Error:
× Unterminated regexp literal
╭─[/home/sjx/DB-GPT/web/new-components/chat/sider/ChatSider.tsx:66:1]
66 │ }
67 │ await refresh?.();
68 │ if (item.conv_uid === chatId) {
69 │ router.push(/chat);
· ───────
70 │ }
71 │ },
72 │ });
╰────
Caused by:
Syntax Error
Import trace for requested module:
./new-components/chat/sider/ChatSider.tsx
./pages/chat/index.tsx
./pages/_app.tsx
Error:
× Legacy octal literals are not available when targeting ECMAScript 5 and higher
╭─[/home/sjx/DB-GPT/web/pages/_app.tsx:71:1]
71 │ // MOCK User info
72 │ const user = {
73 │ user_channel: dbgpt,
74 │ user_no: 001,
· ───
75 │ nick_name: dbgpt,
76 │ };
77 │ if (user) {
╰────
× Legacy octal escape is not permitted in strict mode
╭─[/home/sjx/DB-GPT/web/pages/_app.tsx:71:1]
71 │ // MOCK User info
72 │ const user = {
73 │ user_channel: dbgpt,
74 │ user_no: 001,
· ───
75 │ nick_name: dbgpt,
76 │ };
77 │ if (user) {
╰────
Caused by:
Syntax Error
Import trace for requested module:
./pages/_app.tsx
> Build failed because of webpack errors解决方案:
/DB-GPT/web/new-components/chat/sider/ChatSider.tsx中约69行处由
1 | router.push(/chat); |
改为
1 | router.push('/chat'); |
/DB-GPT/web/pages/_app.tsx中约71行由
1 | user_no: 001, |
改为
1 | user_no: 1, |
但是这里还有个错误,这个错误并没有在编译的时候显示,但是你在运行后的网站中F12打开console控制台会出先dbgpt is not defined的错误
所以这里应该改为
1 | user_channel: 'dbgpt', |
报错内容
1
2
3
4
5
6
7
8
9
10
11
12
13
14
15
16
17
18
19
20
21
22
23
24
25
26
27
28
29
30
31
32
33
34
35
36
37
38
39
40
41
42
43
44
45
46
47
48
49
50
51
52
53
54
55sjx@ubuntu:~/DB-GPT/web$ npm run build
> db-gpt-web@0.1.0 build
> NODE_OPTIONS=--max_old_space_size=8192 next build
- warn You have enabled experimental feature (esmExternals) in next.config.js.
- warn Experimental features are not covered by semver, and may cause unexpected or broken application behavior. Use at your own risk.
Failed to compile.
./components/layout/side-bar.tsx
Error:
× Expected ';', got 'items'
╭─[/home/sjx/DB-GPT/web/components/layout/side-bar.tsx:37:1]
37 │
38 │
39 │ function smallMenuItemStyle(active?: boolean) {
40 │ return flex items-center justify-center mx-auto rounded w-14 h-14 text-xl hover:bg-[#F1F5F9] dark:hover:bg-theme-dark transition-colors cursor-pointer ${
· ─────
41 │ active ? 'bg-[#F1F5F9] dark:bg-theme-dark' : ''
42 │ };
43 │ }
╰────
Caused by:
Syntax Error
Import trace for requested module:
./components/layout/side-bar.tsx
./pages/_app.tsx
./new-components/chat/sider/ChatSider.tsx
Error:
× Unexpected token `Flex`. Expected jsx identifier
╭─[/home/sjx/DB-GPT/web/new-components/chat/sider/ChatSider.tsx:73:1]
73 │ };
74 │
75 │ return (
76 │ <Flex
· ────
77 │ align='center'
78 │ className={group/item w-full h-12 p-3 rounded-lg hover:bg-white dark:hover:bg-theme-dark cursor-pointer mb-2 relative ${
79 │ active ? 'bg-white dark:bg-theme-dark bg-opacity-100' : ''
╰────
Caused by:
Syntax Error
Import trace for requested module:
./new-components/chat/sider/ChatSider.tsx
./pages/chat/index.tsx
> Build failed because of webpack errors解决方案:
修改/DB-GPT/web/components/layout/side-bar.tsx文件中的
1 | return flex items-center justify-center mx-auto rounded w-14 h-14 text-xl hover:bg-[#F1F5F9] dark:hover:bg-theme-dark transition-colors cursor-pointer ${ |
改为
1 | return `flex items-center justify-center mx-auto rounded w-14 h-14 text-xl hover:bg-[#F1F5F9] dark:hover:bg-theme-dark transition-colors cursor-pointer ${ |
另一个报错不知道是不是我之前修改的问题,不知道是不是下载下来就有的问题。
只需要在文件/DB-GPT/web/new-components/chat/sider/ChatSider.tsx中上方导入
1 | import { Flex } from 'antd'; |
环境版本报错修改
- 报错内容
1 | ./node_modules/@antv/g2/esm/transform/sample.js |
修改了以下两行内容:
1 | "@antv/g2": "5.1.6", |
但最后还是忽略兼容强行安装
1 | npm install --legacy-peer-deps |
报错内容
这是一个prettier 格式错误
1 | ./components/layout/side-bar.tsx |
所以在npm run build 之前还需要先执行
1 | npm run format |
整体代码如下:
1 | npm run compile |
在解决报错之后发现前端构建完毕后依然没有实现修改,后来发现实际用到的out文件夹居然在web文件夹外面
于是我们要在DB-GPT/web文件夹中将前端构建的out文件夹移到对应的位置
1
2rm -rf ../packages/dbgpt-app/src/dbgpt_app/static/web/*
cp -r out/* ../packages/dbgpt-app/src/dbgpt_app/static/web/
使用教程
在DB-GPT文件夹下执行以下指令
1 | uv run dbgpt start webserver --config configs/dbgpt-proxy-deepseek.toml |
其中—config后面的文件可以选择你使用的配置文件。
执行完毕后,当相关加载项加载完毕后,在浏览器中输入
1 | localhost:5670/ |
即可进入DB-GPT。
你可以在探索广场选择合适的机器人进行交流,然后配置你需要访问的数据表。注意配置数据库的时候如果你使用的是虚拟机,你的host是虚拟机的对应IP地址。